


If you want to view this guide in PDF format, download it here.
Introducing ReturnsCenter
ReturnsCenter is a powerful, easy to use, web application that simplifies the process of scheduling and tracking product your returns.
This quick start guide provides an overview of the basic operation and features of the ReturnsCenter application. It assumes that you are familiar with the hardware platform you will use to access the application (computer, tablet, or smartphone), and the basics of browsing the Internet on that device.
The Login page
To reach the ReturnsCenter Login page (shown in Figure 1 below), open a browser window and point it to https://bc-customer.returns.io.
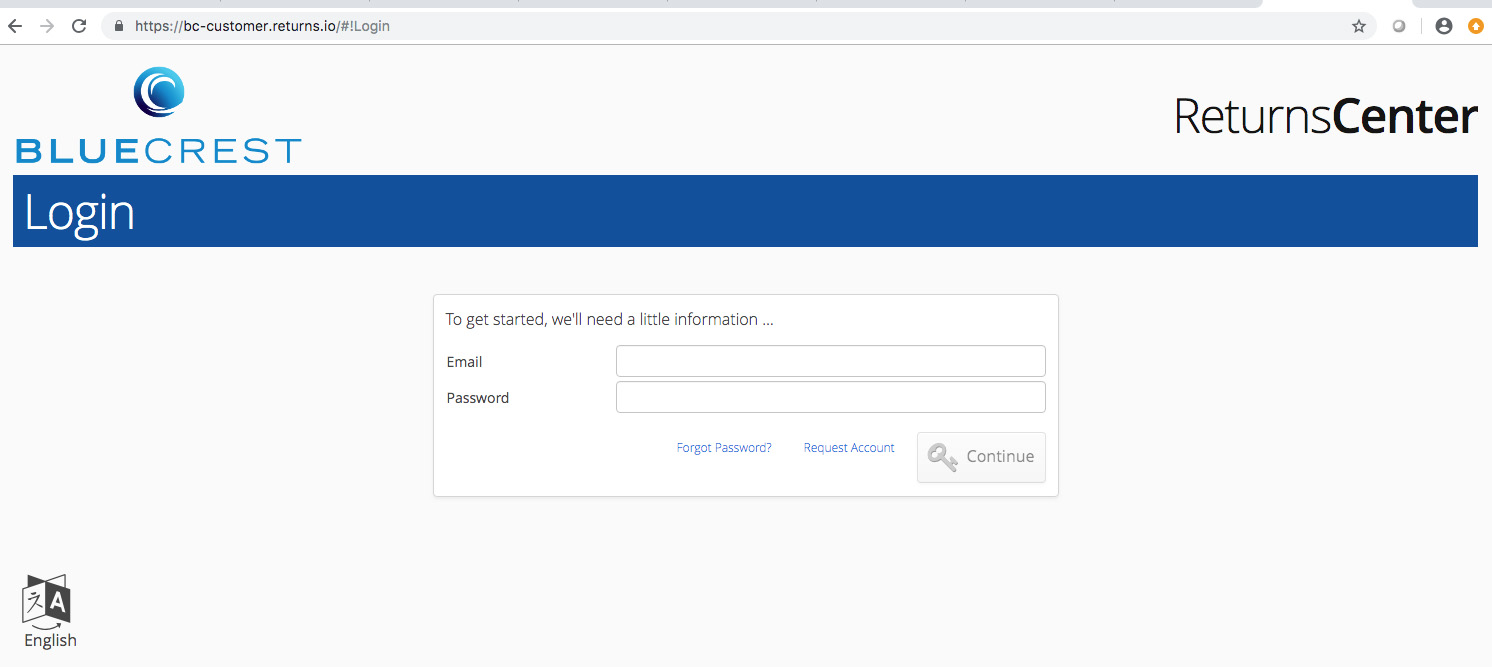
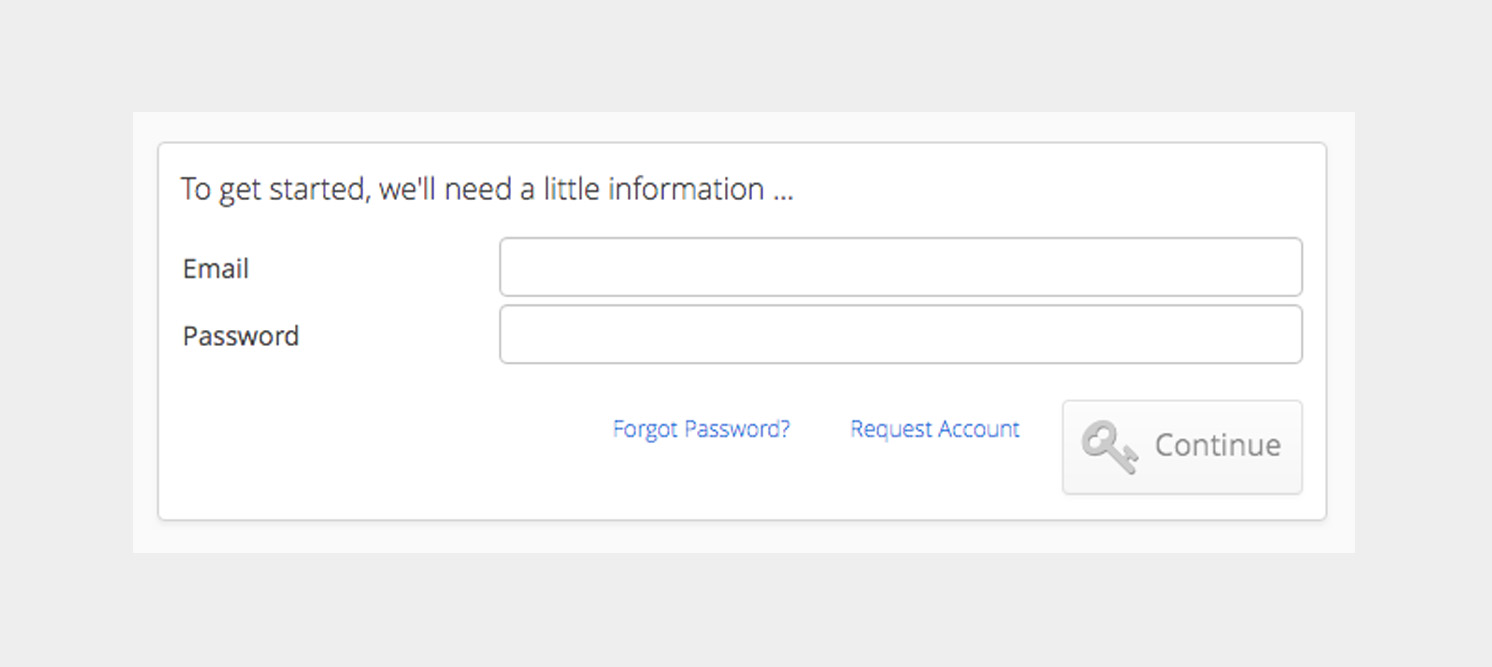
The form in the center of the Login page is used to enter account credentials (see Figure 2 below for details). Also included on the form are links for requesting a new account (Request Account) and for updating a user’s password (Forgot Password?). In the lower left of the page, the language icon may be selected to change the language setting from English to Spanish, French, or German.
Logging In
If you already have a ReturnsCenter account, simply enter your email address and password into the provided fields, then enter return on your keyboard or click the Continue button on the form to complete the login process.
Note that password information is case-sensitive. If you experience trouble logging in, please check to ensure Caps Lock is not enabled on your keyboard.
Creating a new account
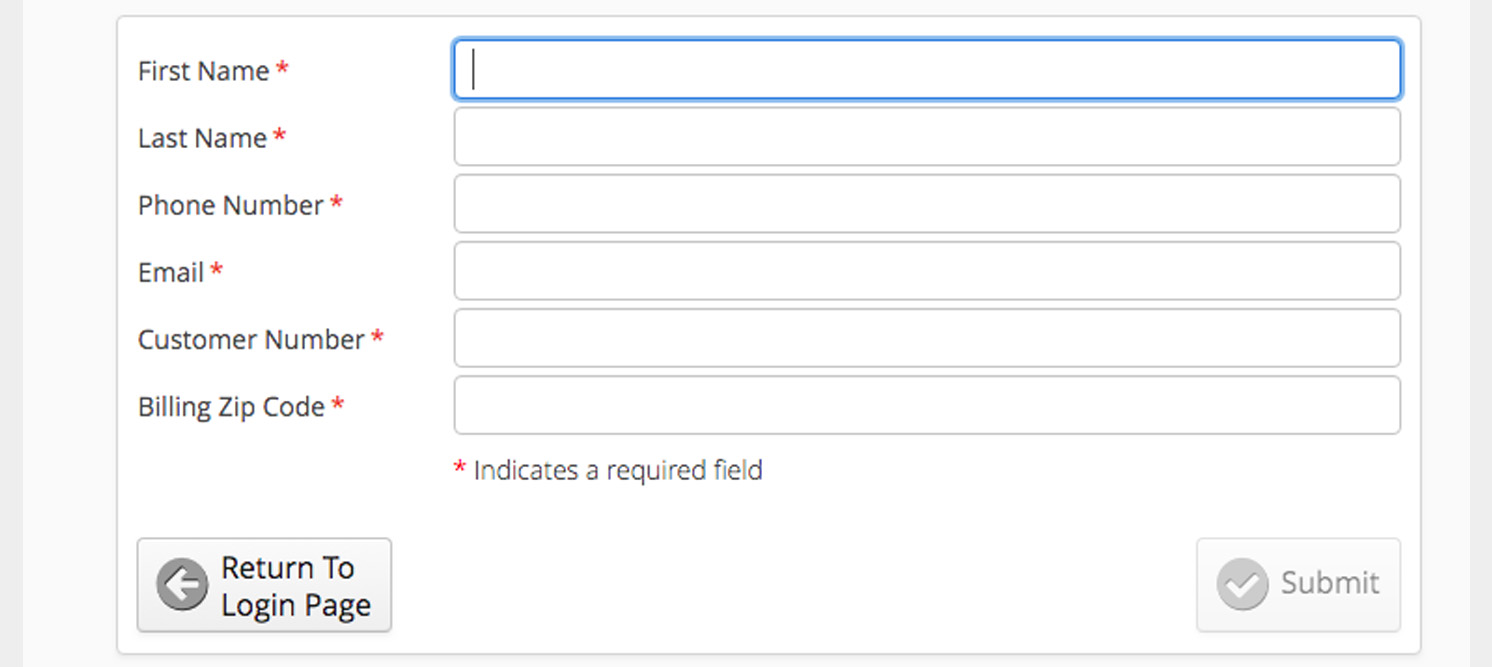
Select the Request Account link to display the form shown in Figure 3. Once the required information is entered, use the Submit button to send the data to the ReturnsCenter servers for validation. You will then be prompted to create a password and logged into the application.
Updating your password
If you forget your password, simply select the Forgot Password? link on the login form. You will then see the information shown in Figure 4.
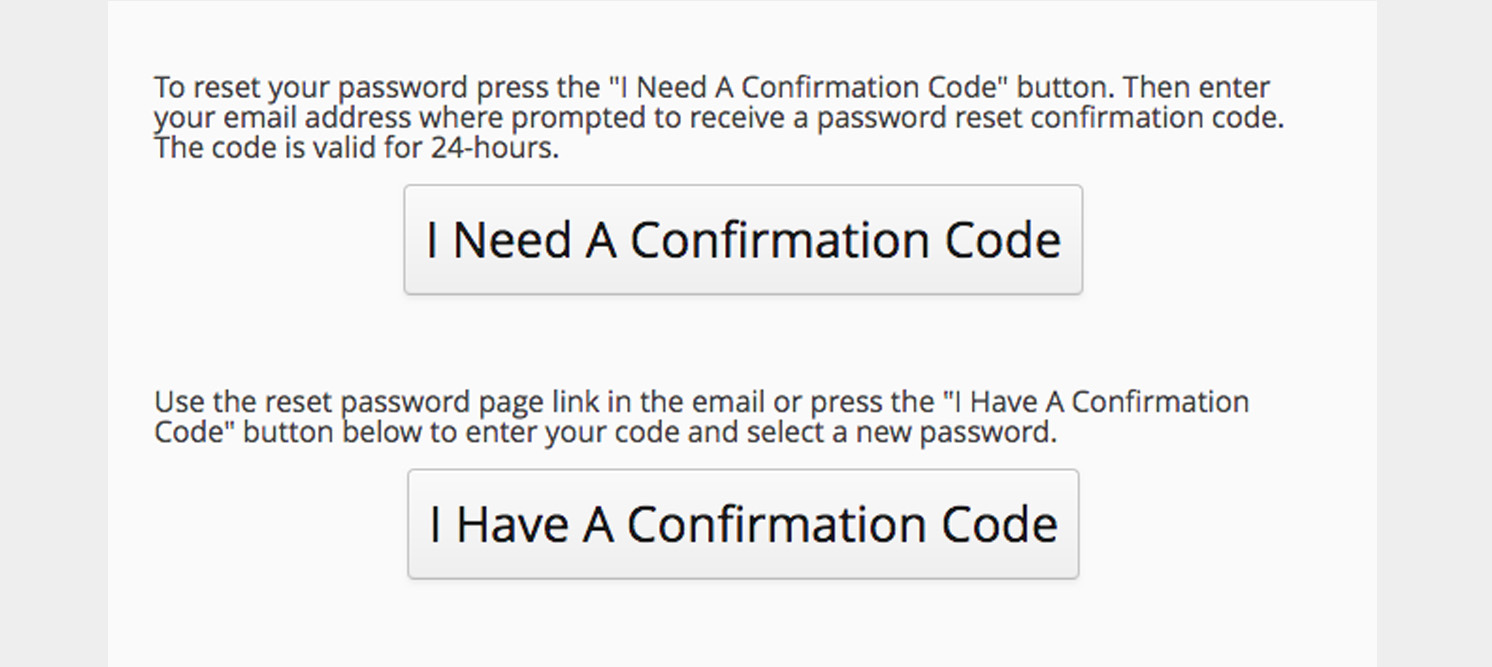
Selecting a new password is a four-step process:
- Click or tap the I Need A Confirmation Code button to begin the process. You will be asked to enter the email address associated with your account.
- You will receive an email titled "Password Reset Confirmation Code". This email contains a secure link for resetting your password. This link and the confirmation code are valid for 24 hours.
- Open the email and click the reset password page link to open a browser tab to the Lost Password Confirmation Code page, or return to the Forgot Password? page, tap the I Have A Confirmation Code button, and enter your confirmation code.
- Verify your email address and confirmation code, then enter and confirm your new password.
Dashboard page
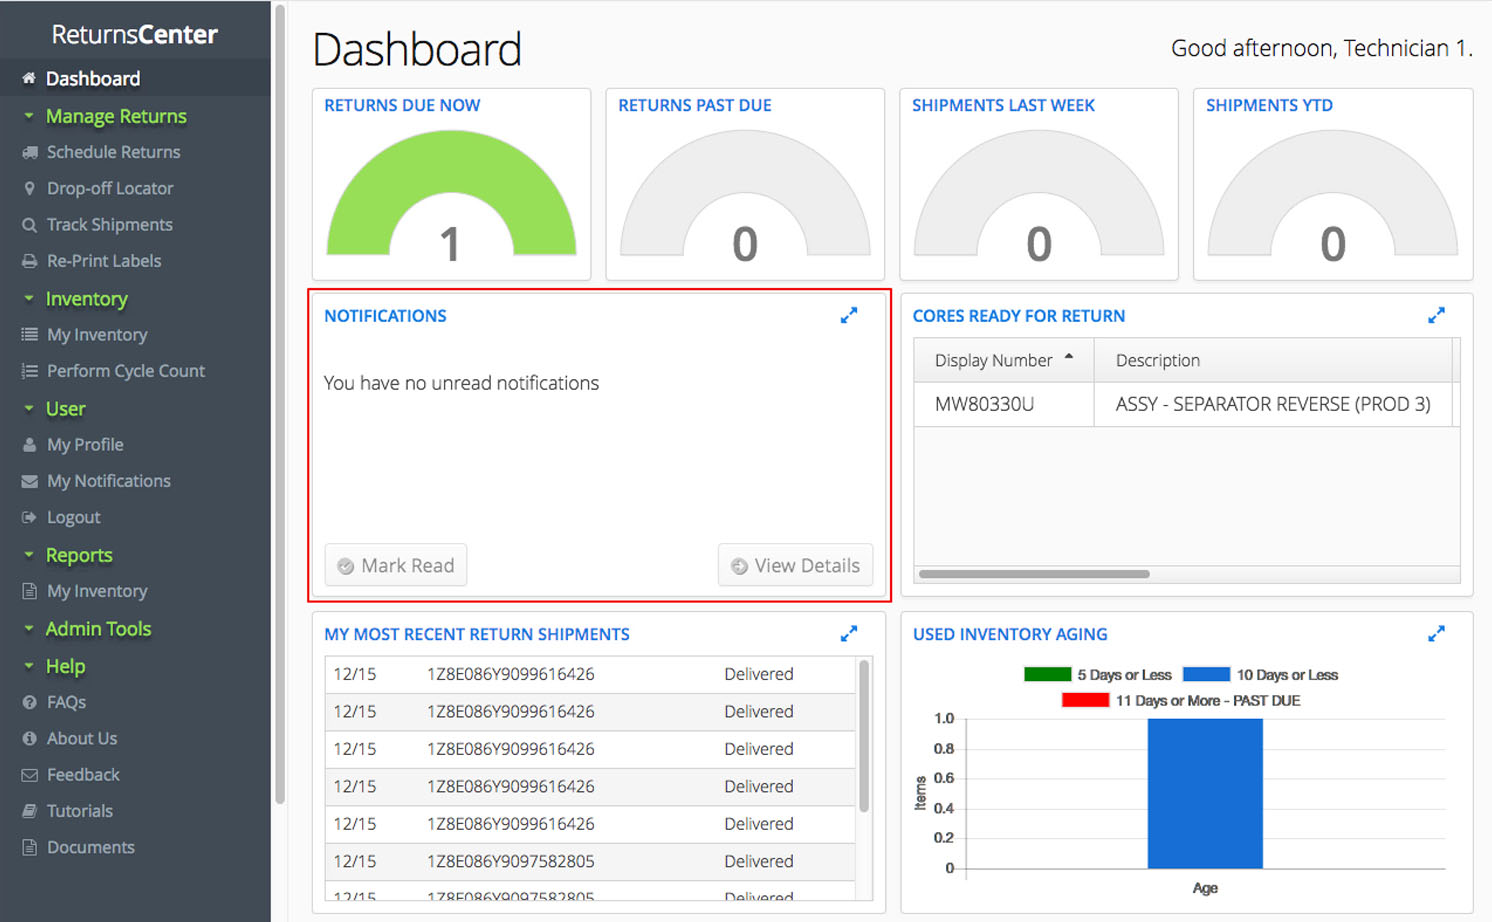
After successfully logging in, users arrive on the application’s Dashboard page. The dashboard offers overview information about your company’s return shipments and defective parts waiting to be returned for credit.
In the top row, there are gauges identifying the number of defective parts waiting to be returned for core credit, the status of your return shipments, and the number of return shipments your company has returned year-to-date.
The Notifications widget (center-left) displays messages of interest, including information about your account, software changes, and other important notices. To dismiss a notification, click the Mark Read button.
For messages that exceed the box size, use the View Details button to see an expanded view of the message. Note that once a message is marked as read, it is no longer displayed in the dashboard’s Notifications widget, but the message can still be viewed on your My Notifications page.
The Cores Ready For Return widget (center-right) lists parts requiring a defective part return as part of a "core exchange" transaction.
On the bottom row of the dashboard, the widget on the left lists details about your company’s most recent return shipments, and the widget on the right identifies how long defective cores have been waiting for their return to be scheduled.
The application’s navigation menu is on the left side of each page. Use the menu to move between the various pages of the ReturnsCenter application.
Logout (exit the application)
Select Logout from the menu to exit the ReturnsCenter application.
The Manage Returns section
The Manage Returns section the menu includes pages for scheduling, dropping off, and tracking return shipments.
Schedule Returns page
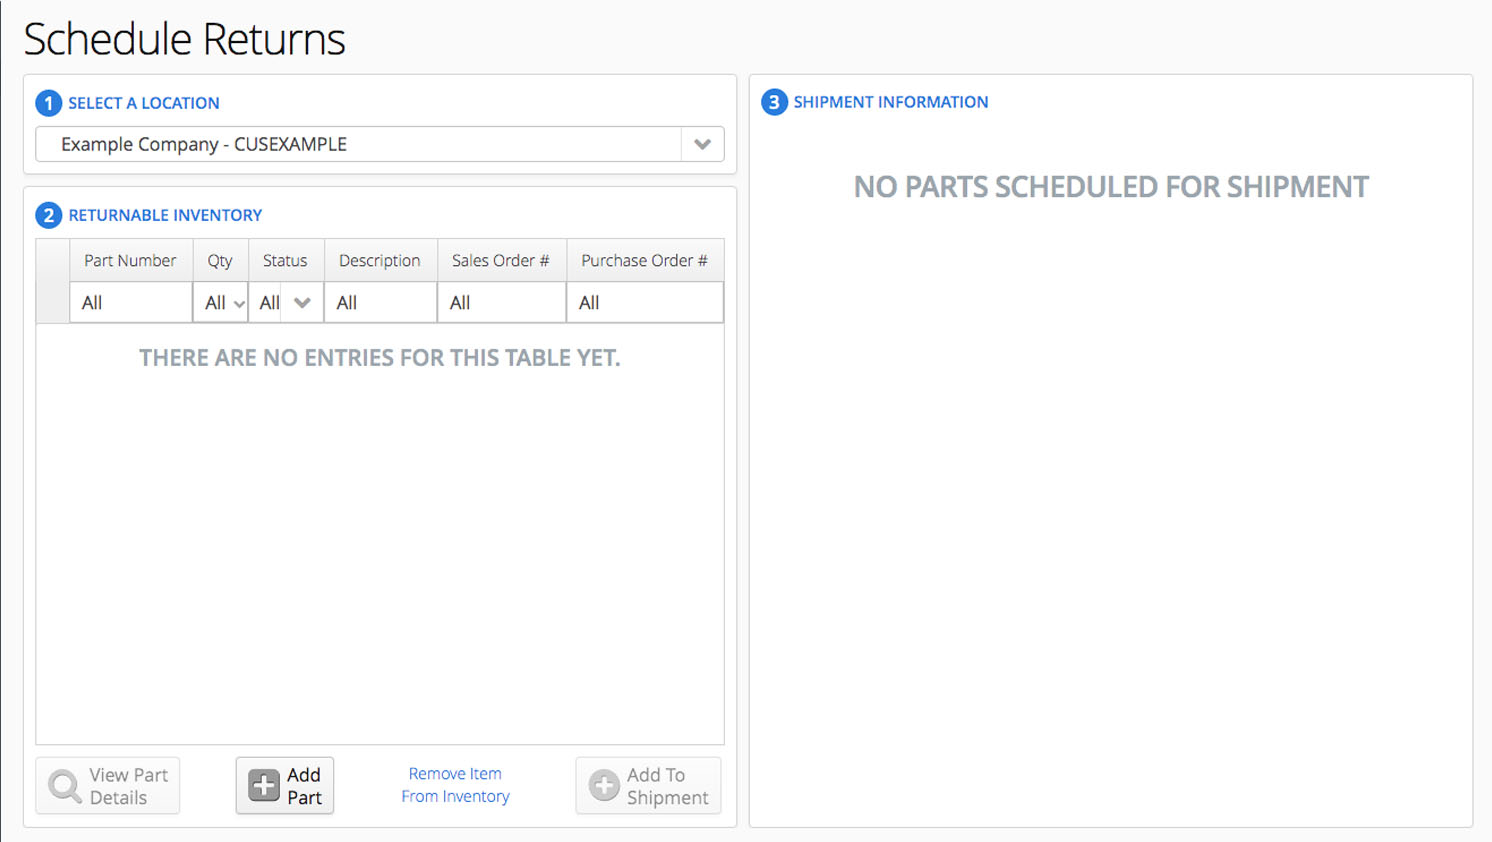
The Schedule Returns page is used to create return shipments and generate the necessary tracking labels and packing slips for each carton in a shipment. All parts returned to BlueCrest as part of a core exchange, for credit, restocking, or recycling must be processed using this page to ensure proper crediting.
Scheduling a return shipment is a three-step process as shown in Figure 6 (above) and described below:
Select a Location
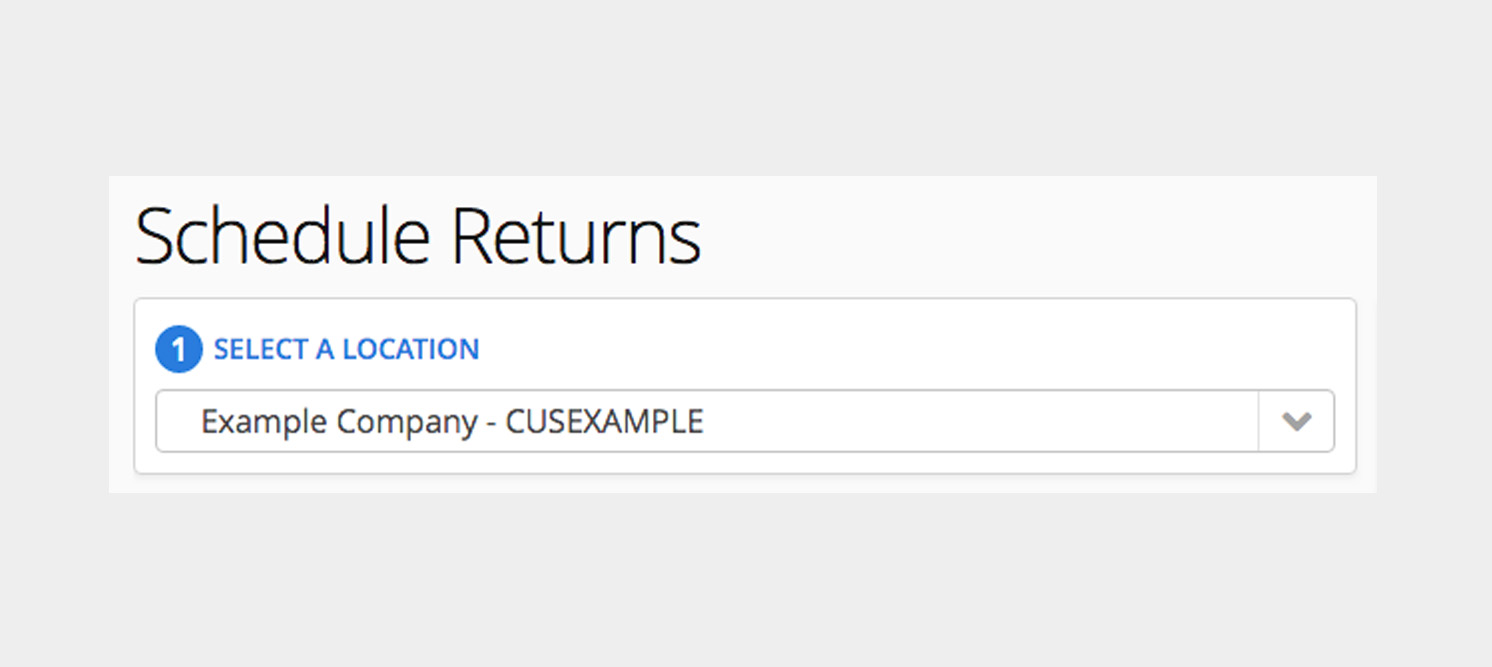
The process begins with identifying your business location. By default, each user is associated with a single business location and that location is pre-selected for you when the page is loaded. If your user account is linked to multiple locations, you must select the specific location for your return from the combo box (Note: Associating multiple business locations with a user account is done on the My Profile page, which is described in the User section of this guide).
Parts Available to Return
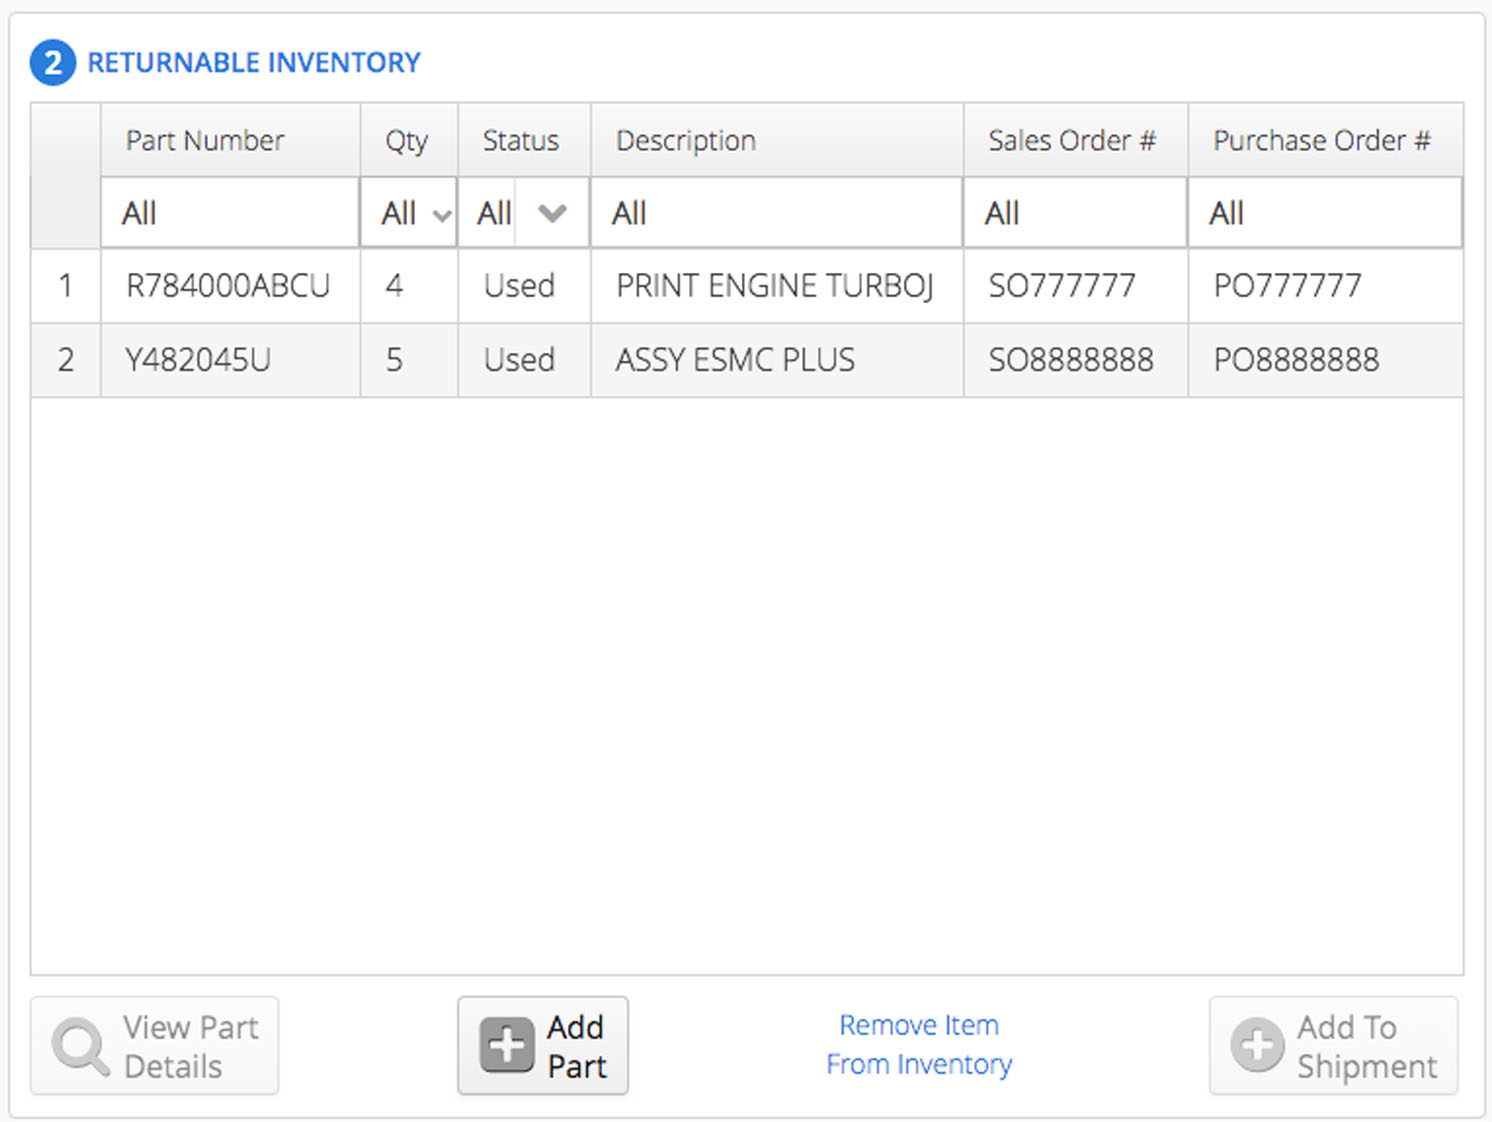
The second step of the process is viewing and adding parts for return. Used parts may be returned as part of a core exchange or for recycling, and new parts may be returned for restocking or to address an issue with the order you received (i.e., wrong part number received, incorrect quantity, shipment damage, etc.).
View Part Details button
To view detailed information about a part, select the part and press the View Part Details button. This displays detailed information about the selected part (see Figure 9). To return to the table view, select the View Inventory button.

Add Part button
To add parts to the table, use the Add Part button. Complete the fields shown in Figure 10 and select Add Part to complete the process or choose the Back button to return to the table view without adding parts.

Remove items from inventory link
To remove a part, select a table row to highlight the part and press the Remove Item From Inventory link.
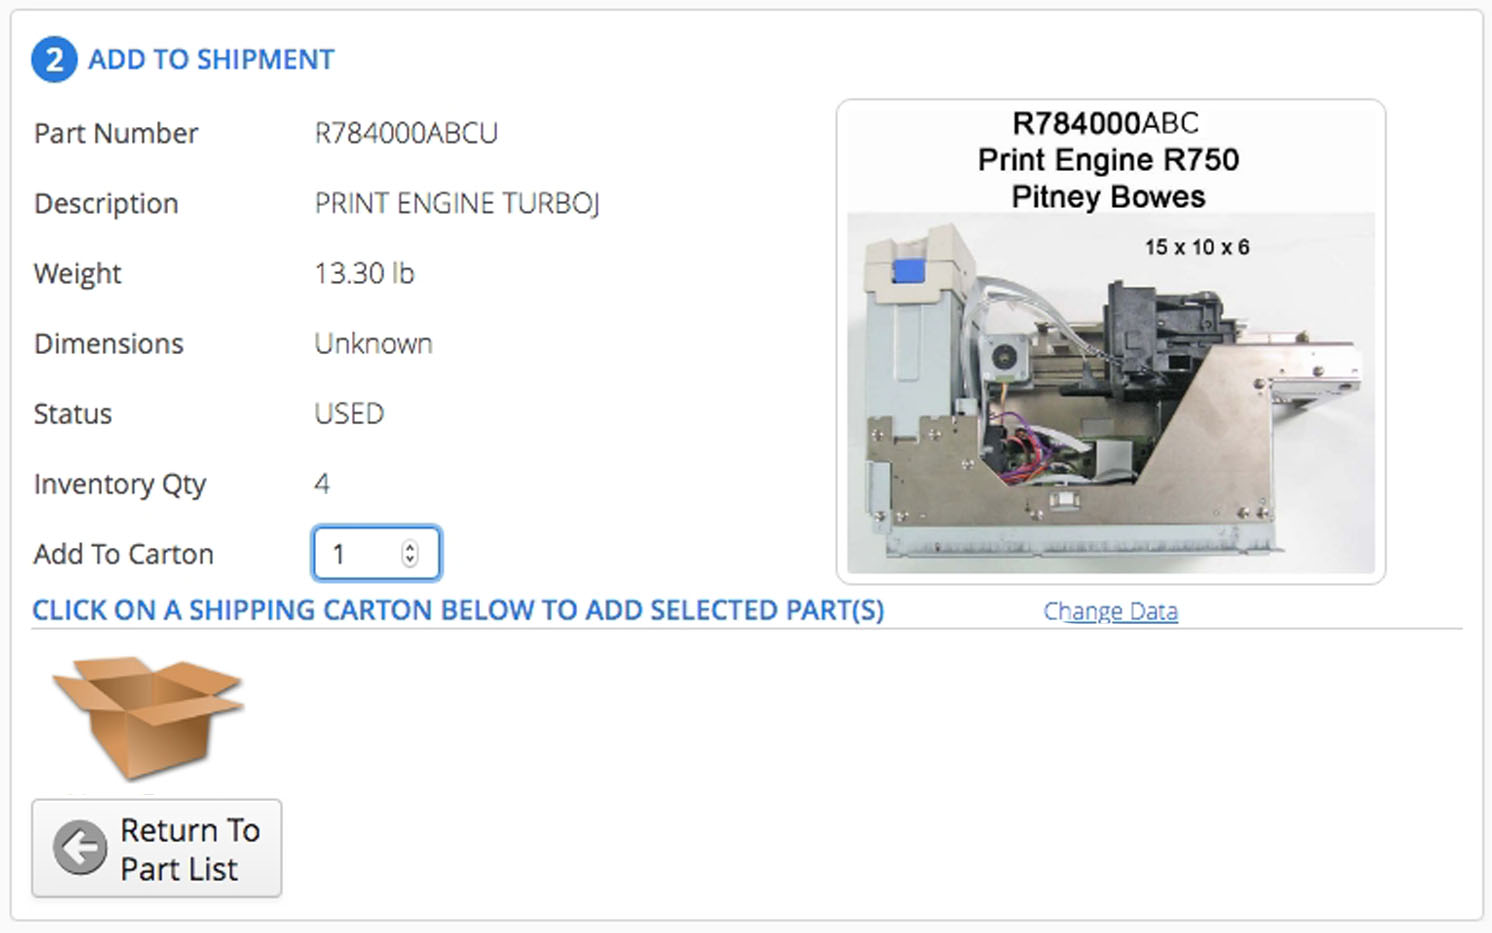
Add To Shipment button
To schedule a part for shipment, select the part in the table and press the Add To Shipment button. First identify the part quantity to be placed in the shipping container. In this example, there is only one shipping container available, called New Carton. Click or tap the New Carton icon to place the part into the carton. If you change your mind about adding these parts to a carton, select the Return to Parts List button to return to the table without scheduling the parts for shipment.
Continue to select parts and quantities for shipping cartons until your shipping order is complete. To place parts into an empty shipping container, choose the New Carton icon. To place parts in a shipping carton that already contains items, select the carton icon. Parts can be added to any carton as long as 1) the parts to be added have the same status (new or used) as the items already in the carton, and 2) the additional parts will not cause the carton to exceed the carrier’s maximum weight limit (usually 150 lbs or 68 kg).
Once all cartons are filled, we’re ready for the final step of the process.
Shipment Information
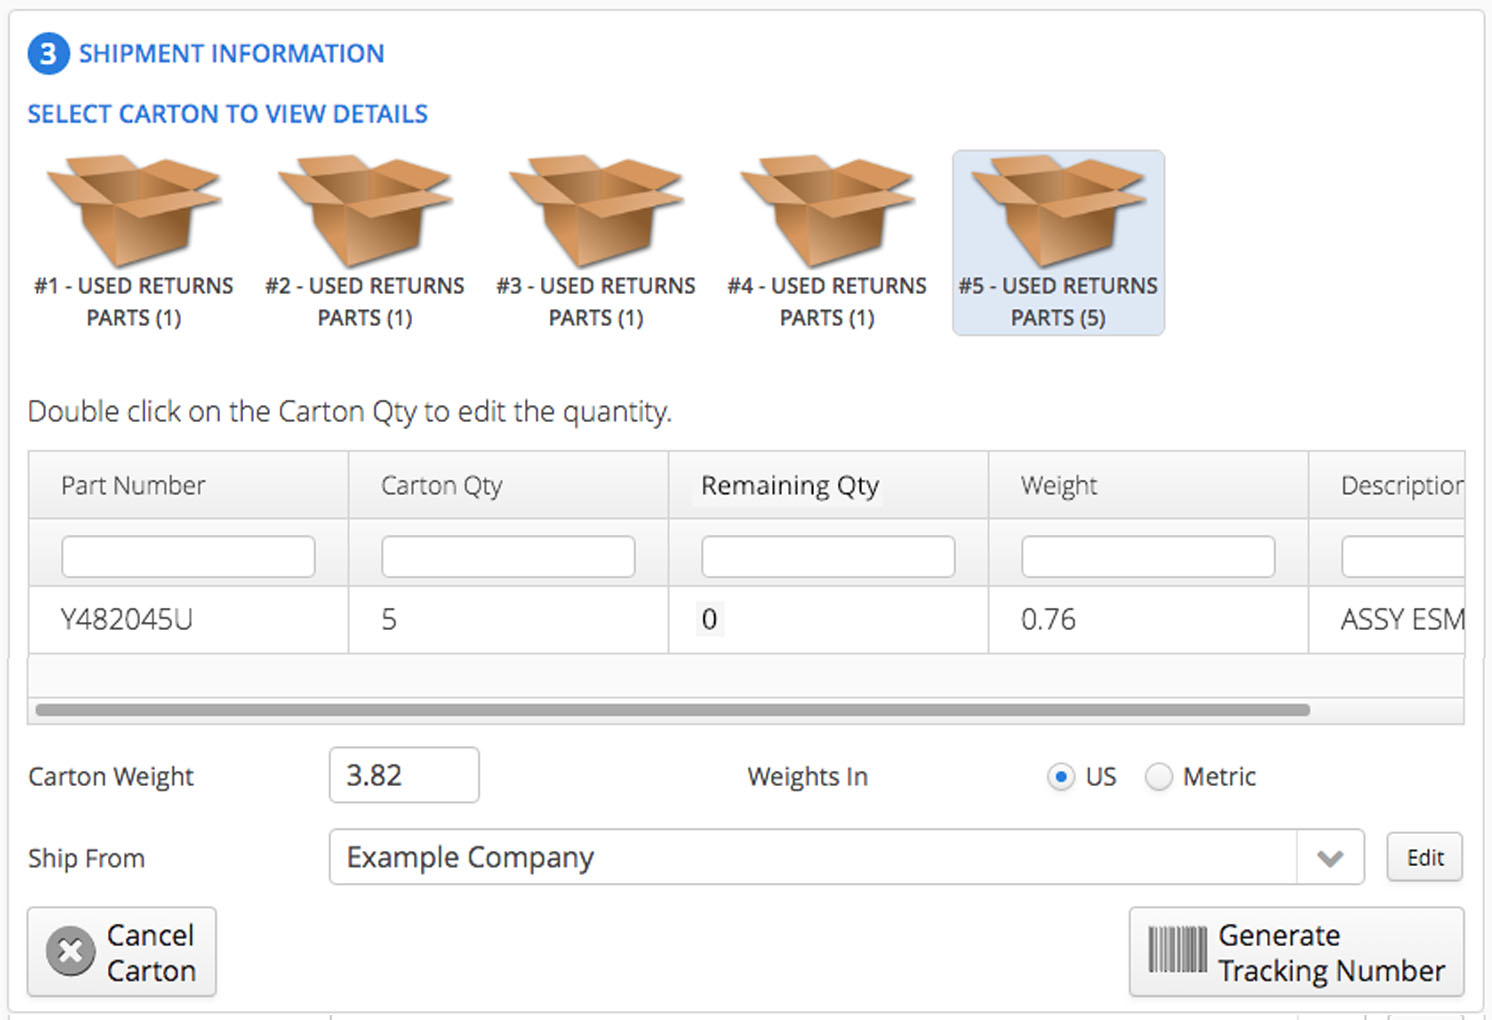
In Figure 12, we've scheduled the nine parts shown in Figure 8 for return. The four R784000ABCU print engines are each in a separate carton (labeled Carton #1 – Carton #4), and the five Y482045U ESMC+ boards are all in carton #5. Note that the quantity of parts in each box is listed in parentheses after the carton name.
Selecting a carton icon highlights it in blue and displays the contents of the carton in the table below. In our example, Carton #5 is highlighted, and the table identifies the five boards we placed into the carton.
The estimated carton weight is displayed along with the option to view the weight measured in pounds or kilograms. If the estimated carton weight is incorrect, the user may enter the correct value. Finally, the originating location for the shipment is selected (by default, it’s the same location as selected in Step #1).
If you decide not to ship the carton, select the Cancel Carton button (Figure 12) and the contents of the carton will be returned to the table described in Step #2.
To generate a shipping label and packing slip for the carton, select the Generate Tracking Number button as shown in Figure 12, above.
The estimated carton weight is displayed along with the option to view the weight measured in pounds or kilograms. If the estimated carton weight is incorrect, the user may enter the correct value. Finally, the originating location for the shipment is selected (by default, it’s the same location as selected in Step #1).
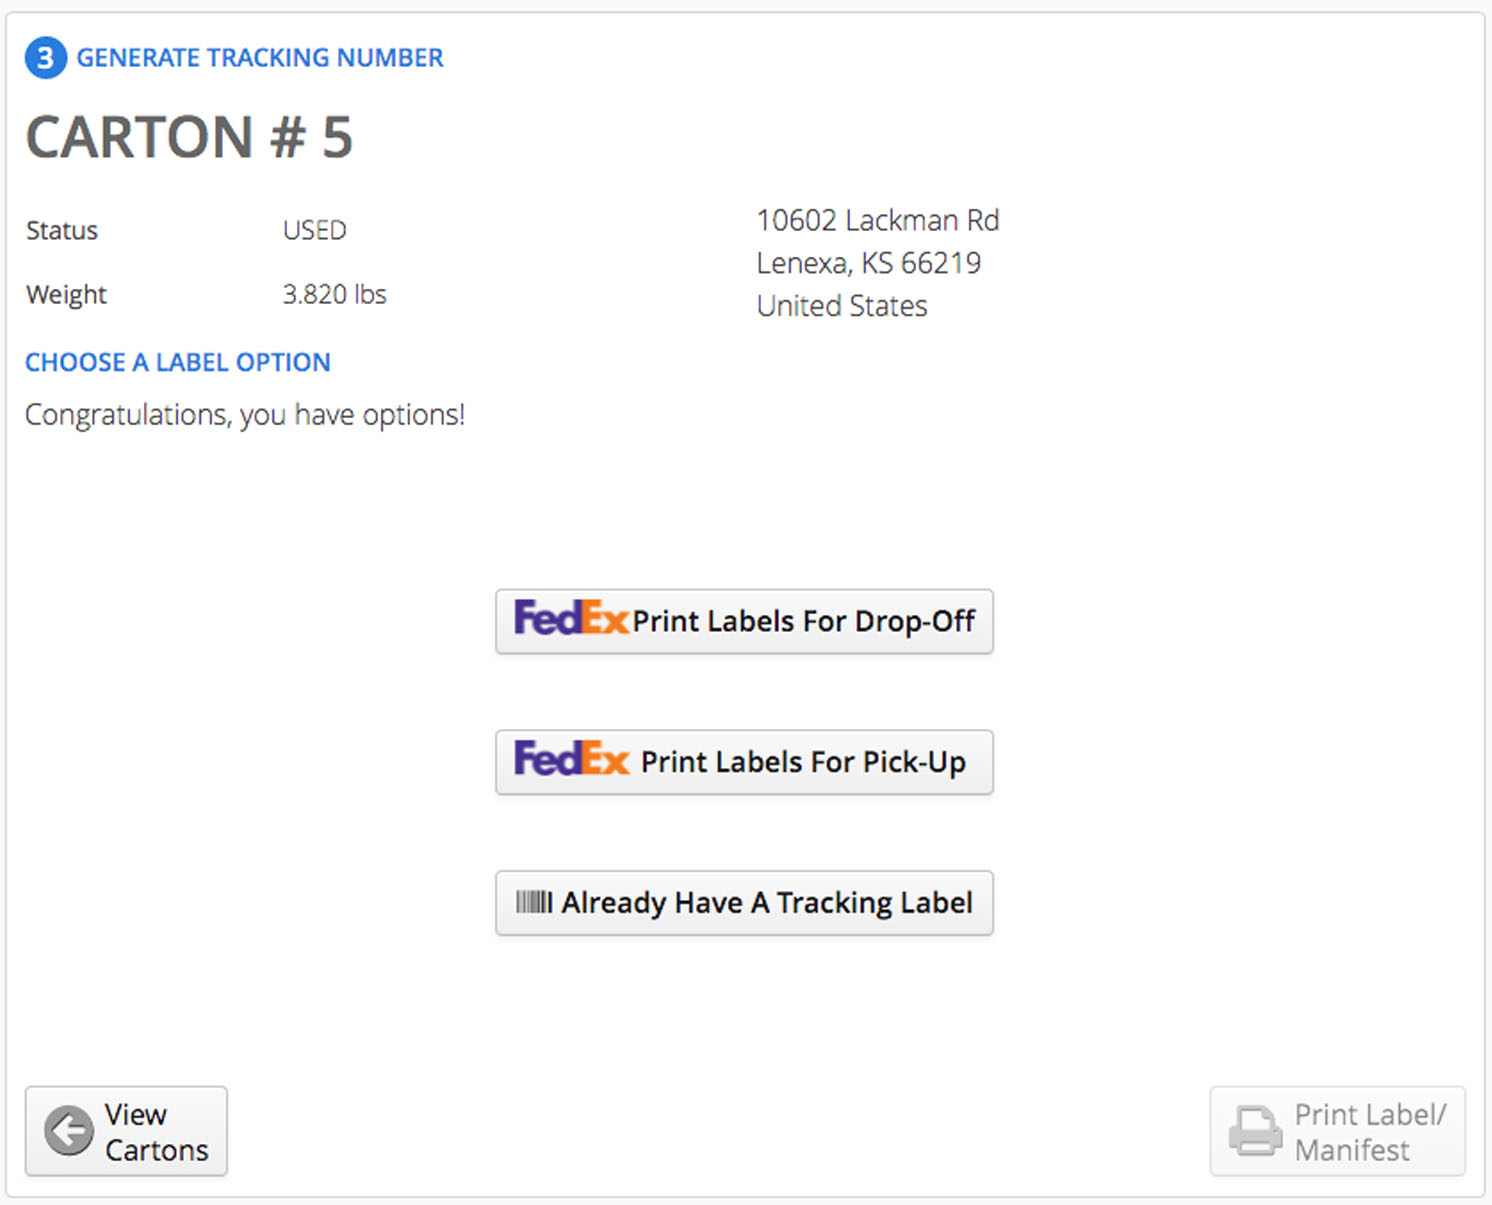
The final task is choosing a label type. To print a label and deliver the package to an authorized carrier drop-off location, choose option one, Print Labels For Drop-Off. To print a label and schedule a pick-up from the originating business address, choose option two, Print Labels For Pick-Up. If you wish to use a label generated from outside the ReturnsCenter application, choose option three, Already Have A Tracking Label. This will require the entering of a tracking number to ensure the package is properly received.
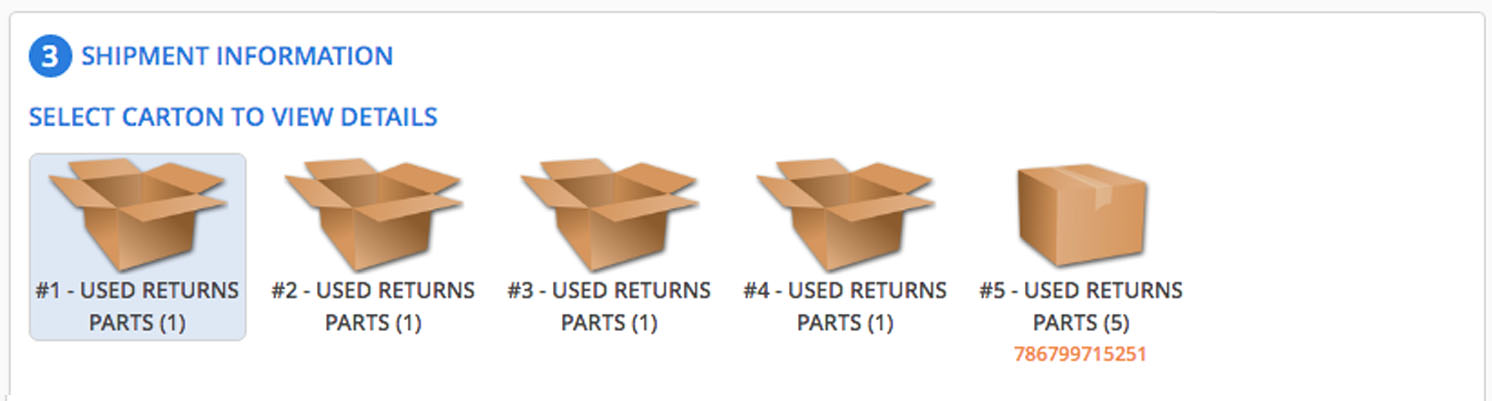
Once this is done, select the Print Label / Manifest button to generate your tracking label and packing slip as PDF documents. These should be printed and attached to the carton. Note that the tracking number is now listed under the carton icon, as shown below.
Repeat the process to generate labels for the remaining cartons.
Drop-off Locator page
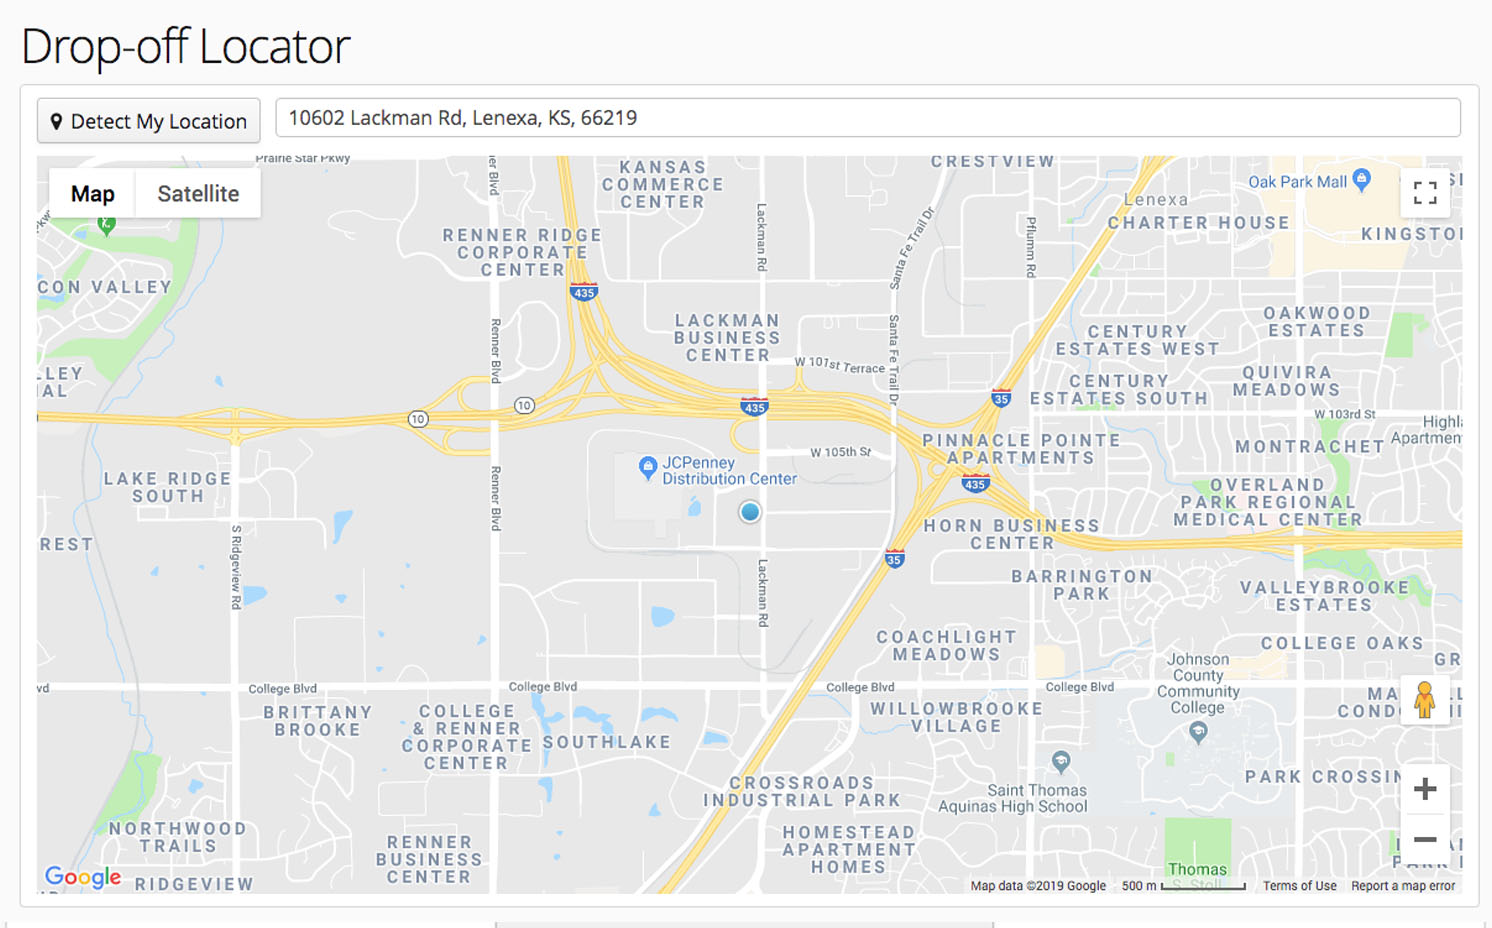
If you wish to take packages to one of the carrier’s authorized drop-off facilities for shipping, this page can assist you to identify a nearby location. Simply enter your current address or use the Detect My Location button to search for a local drop-off location. Click on a pin indicating an identified facility to view the location’s address.
Track Shipments page
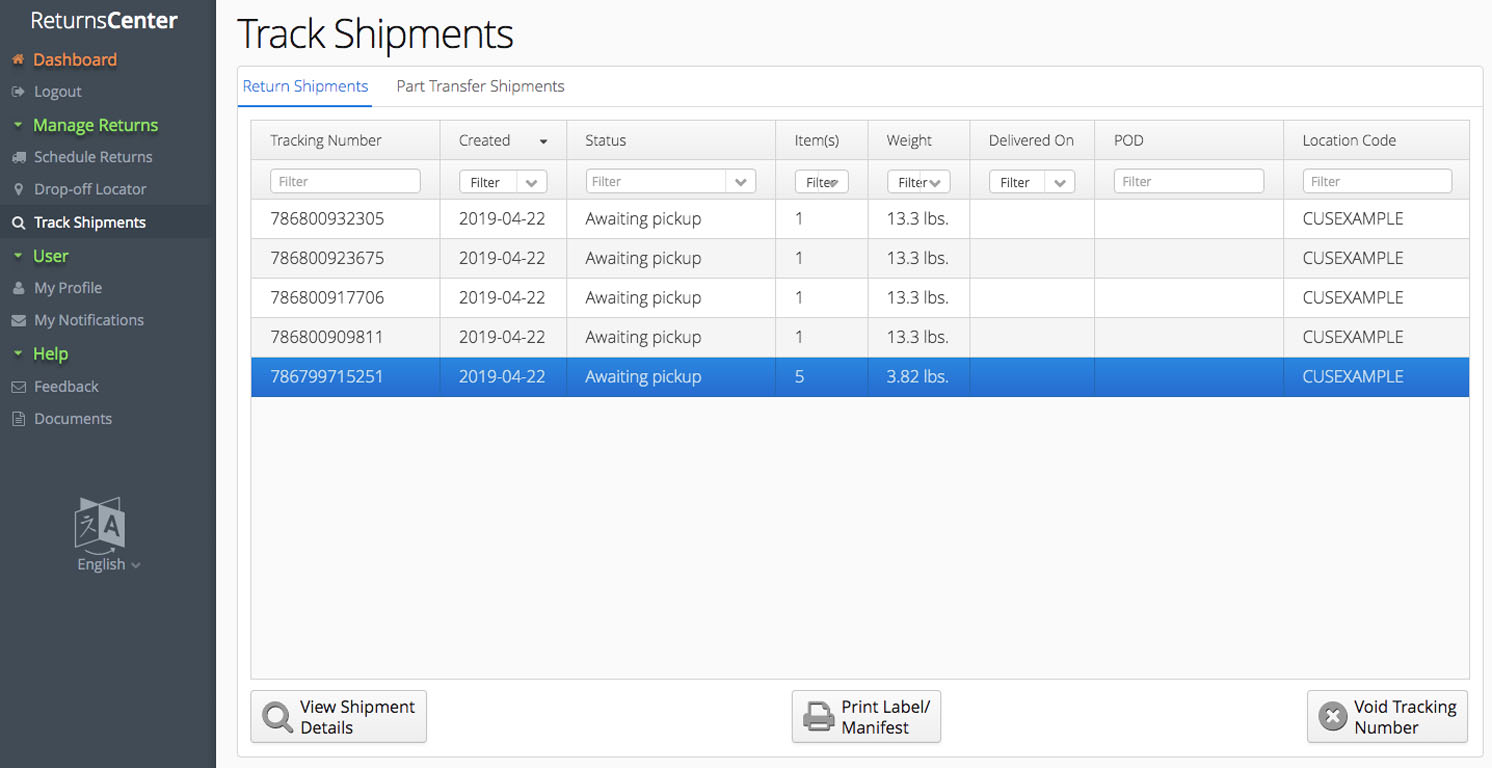
The Track Shipments page lists all your return shipments and their current delivery status. The page also includes buttons for viewing shipment details, reprinting a shipment’s tracking number label and manifest, and for voiding shipments that have not yet been picked-up by the carrier.
To use the buttons, simply select a shipment to highlight the row and tap a button to perform the identified function.
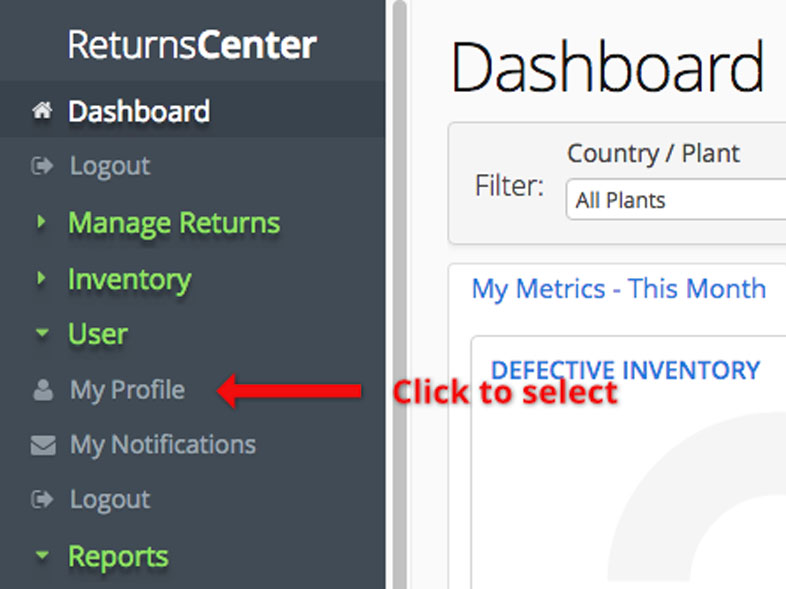
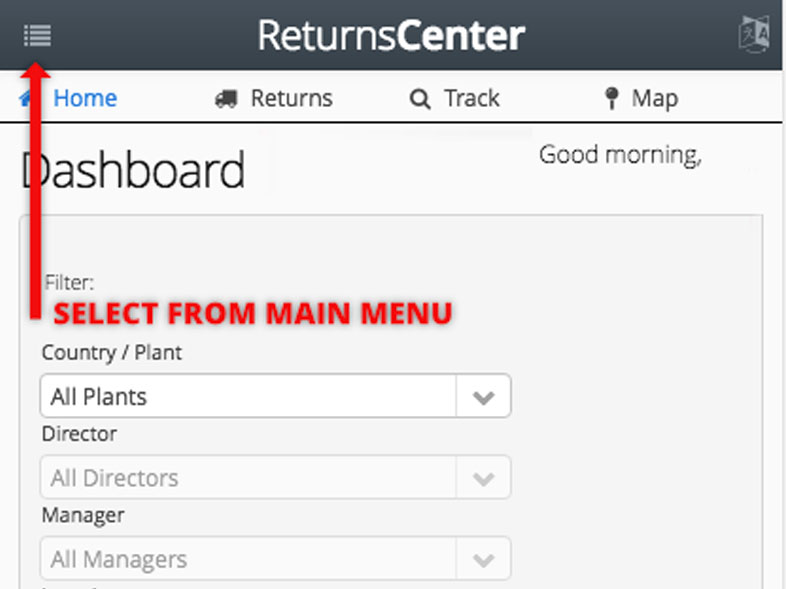
The User section
My Profile page
The My Profile page is where your user account information is managed. You can update your contact information, your preferred method for receiving notifications (email or SMS text message), update your password, and manage the warehouse(s) and addresses associated with your account. To get started, perform the following steps:
In the User section of the application’s menu, select My Profile (as shown in Figures 17 and 18 below).
Overview of the My Profile page
The My Profile page is is where user information and preferences are maintained, the business locations you work with are listed, and the shipping addresses associated with you and your locations are maintained.
The page is organized into three sections as shown in Figure 19 below. The section on the left is for information about you and your preferences, the middle section is focused on the business locations you work with, and the section on the right displays shipping address information. Each section of the page will be described in detail in the following steps of this document.
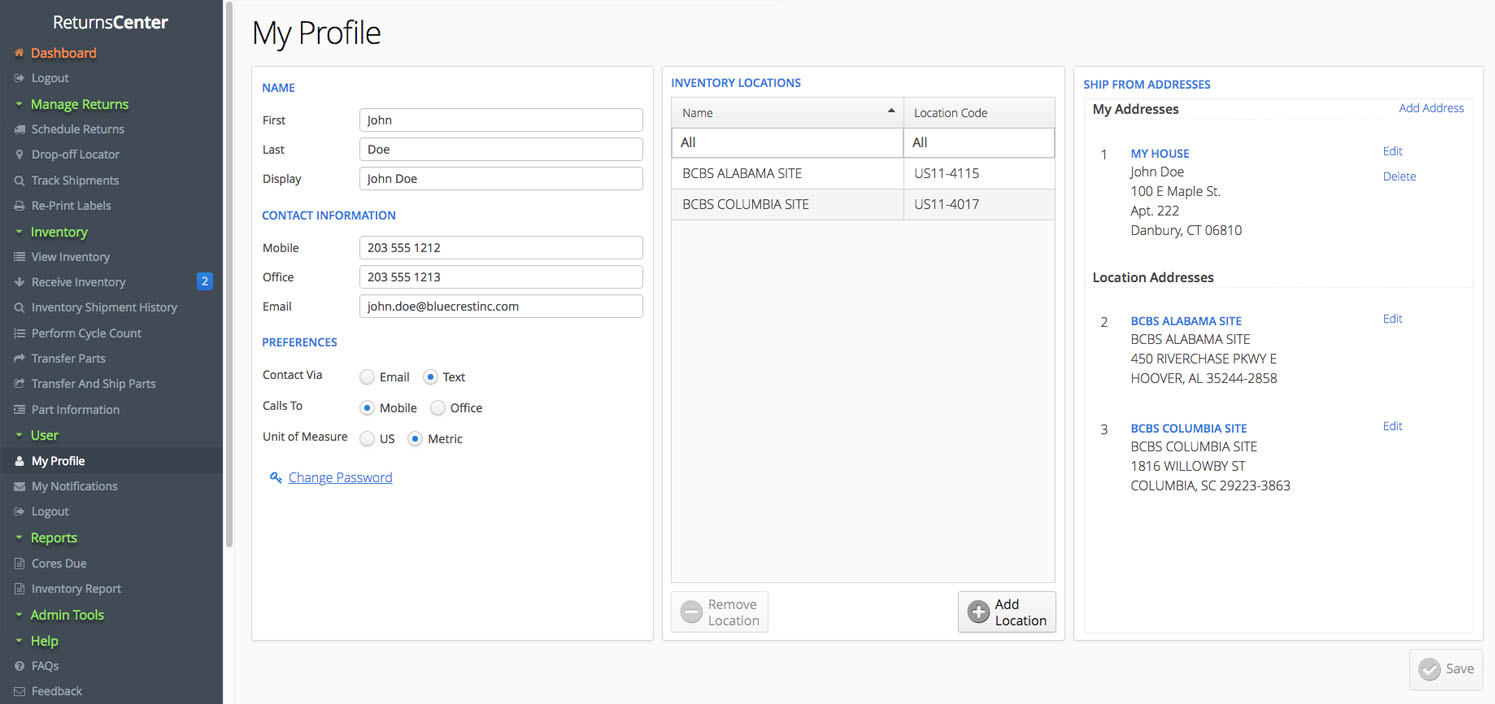
Enter your personal information and preferences (left section)
In the Name block, enter your name and how you would like it displayed within the application and in email and text notifications.
In the Contact Information block, enter your mobile and office telephone numbers and your company email address. Please do not add any additional prefix codes (like "1") to telephone numbers.
Use the Preferences block to identify your preferred contact method and the telephone number we should use if we need to contact you. Also, identify the units of measure you would like displayed by default.
To change your password, click the Change Password link and follow the directions in the pop-up box.
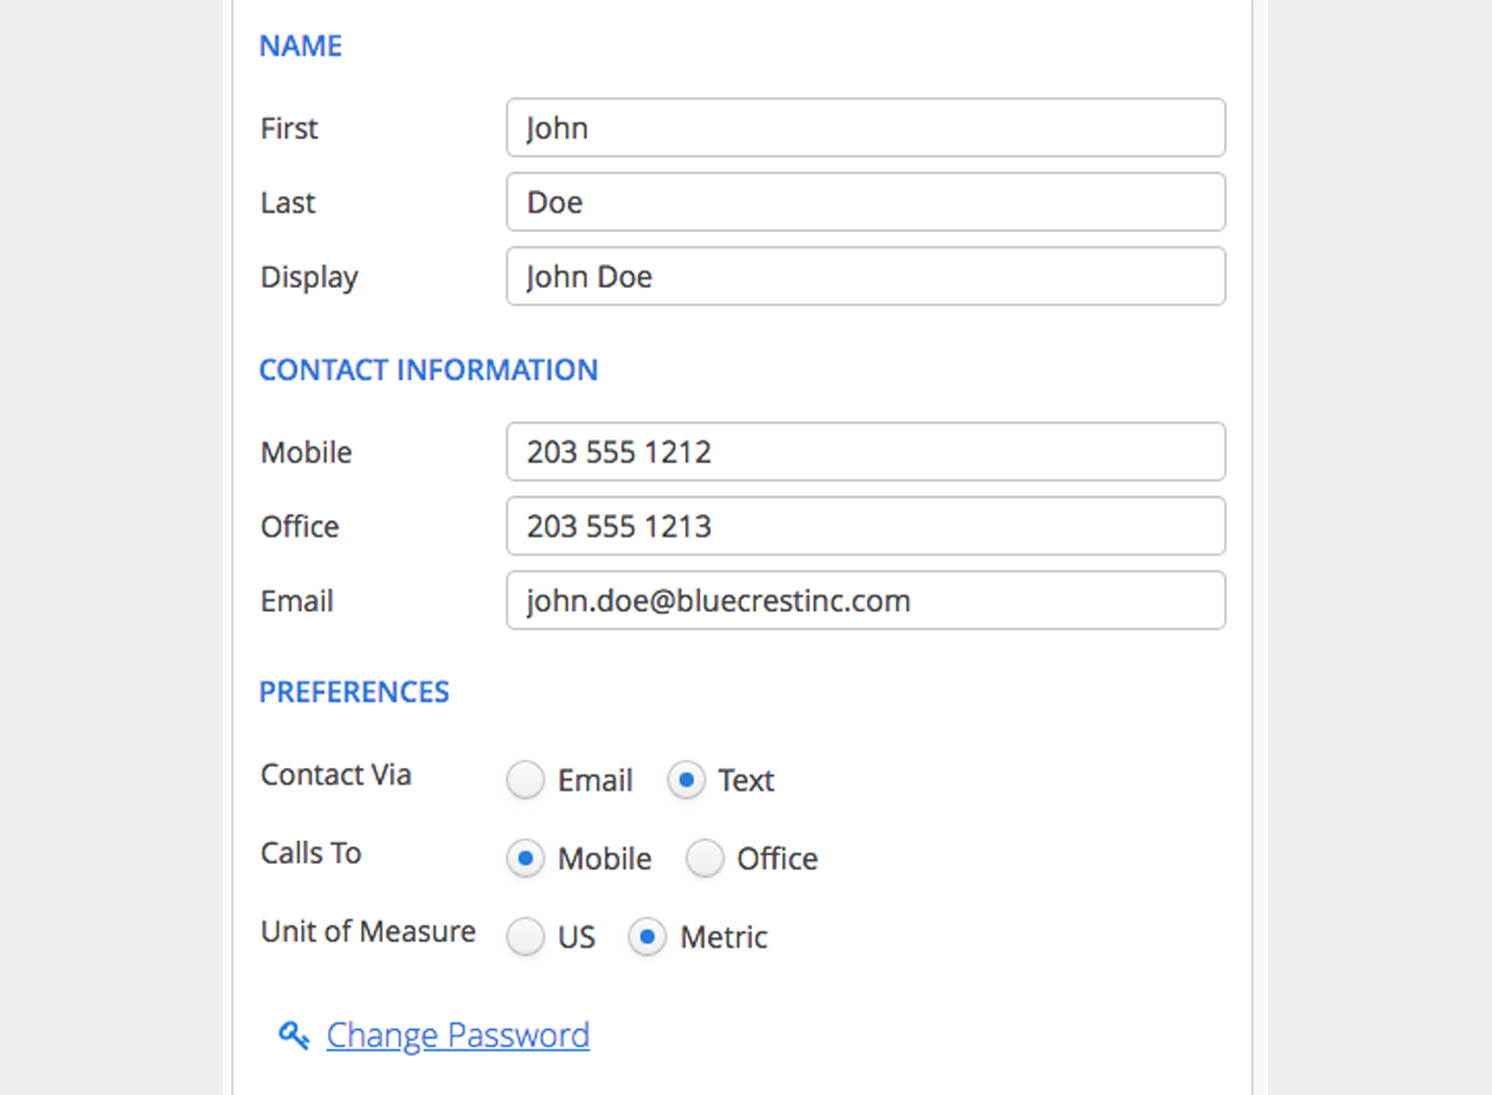
Managing the location(s) associated with your user account (middle section)
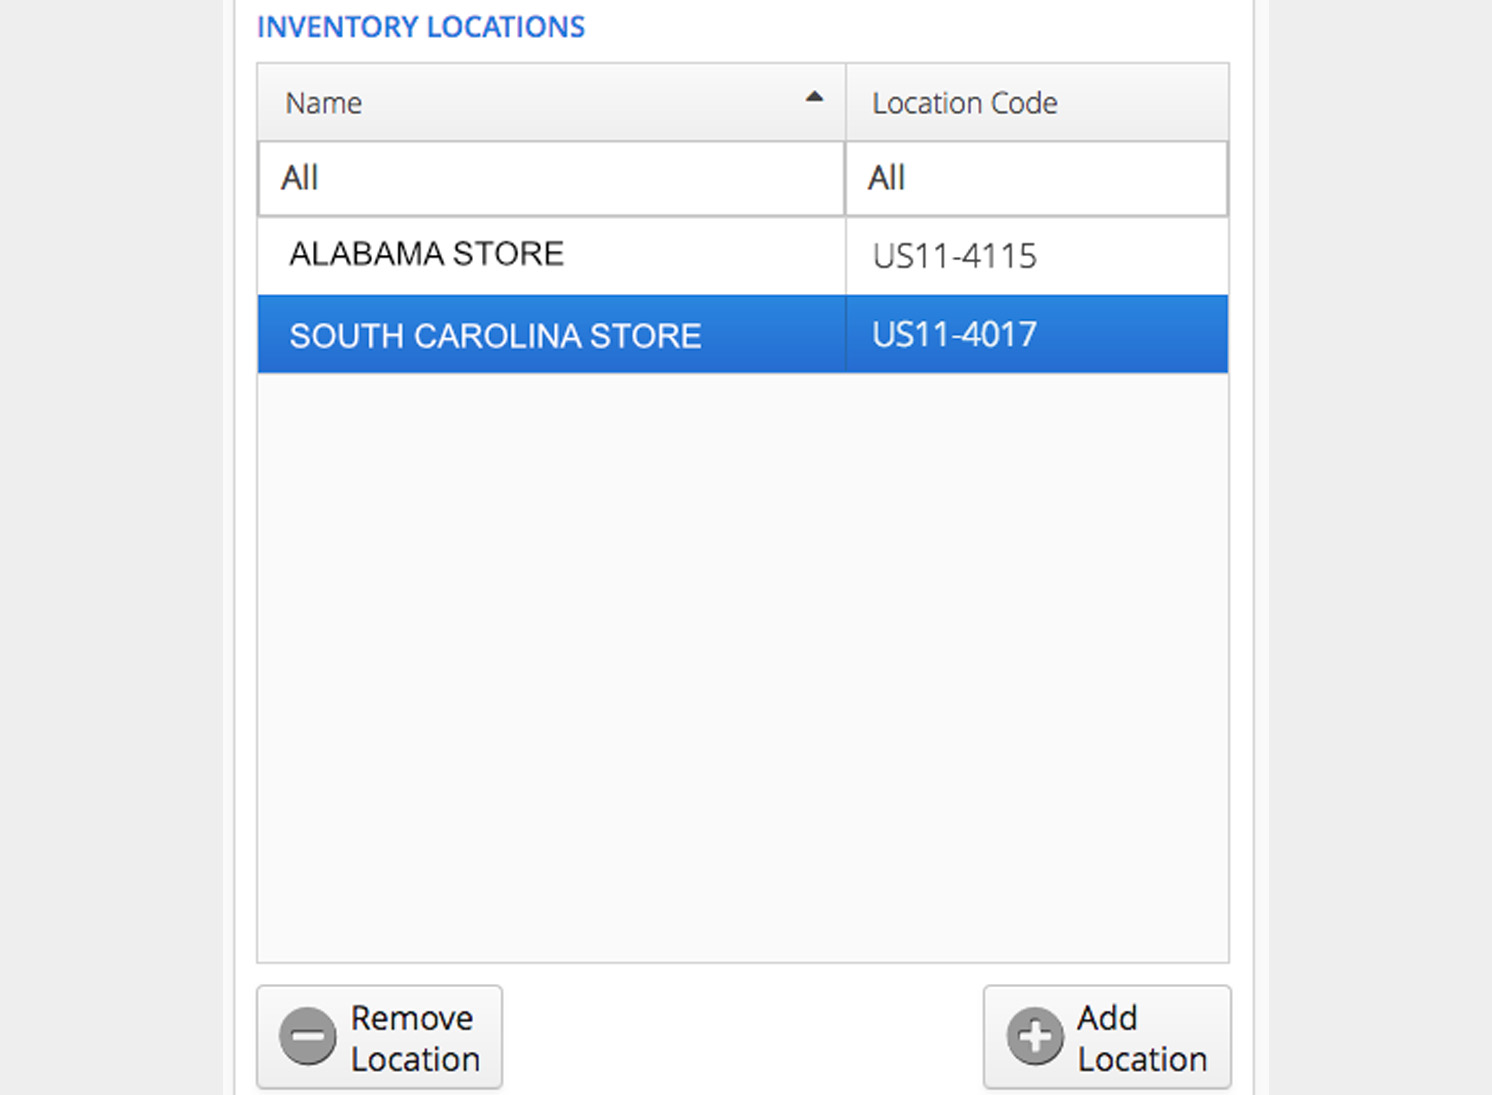
The Inventory Locations section of the page is used to associate one or more business locations with your user account. Before you can do anything related to a location (like scheduling returns), the location must first be linked with your user account in this section of the page.
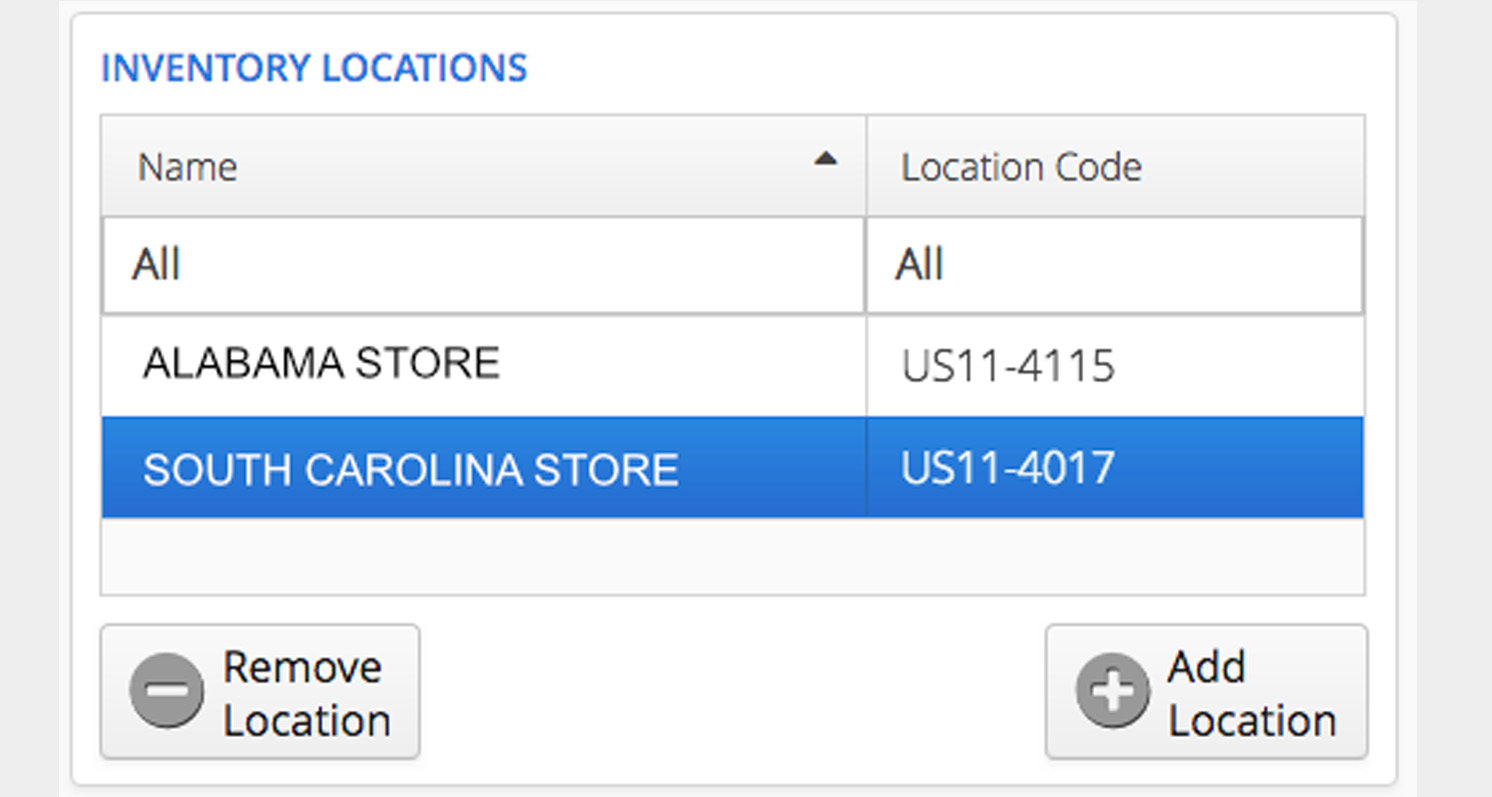
In the figure above, there are two locations associated with this user. To add another location, simply click on the Add Location button, select a location from the drop-down field as shown below, and choose the Add Location button to complete the process. To cancel the operation, choose the Cancel button.
Similarly, if you no longer wish to be associated with a location, select the location from the table to highlight its row, then click the Remove Location button as shown in the figure below.
Shipping Address: Select an address from your address book. This identifies the pick-up / return address for the shipment being created.
Selected Carton Icon: The selected carton is identified by a blue box around the icon. This icon has closed flaps indicating the carton is ready to ship and has a tracking number assigned (orange number). Each icon indicates the carton number (#1), the type of material being shipped (used), the carrier & carton destination (UPS TO XTEC), and the number of items in the carton (“(5)”).
Unselected carton Icon: Unselected cartons are identified by a white background. This icon has open flaps indicating the carton is still available to have additional parts added.
Carton manifest: This grid lists the parts and quantities loaded in the selected carton.
Carton weight: This field identifies the total carton weight. This field initially contains an estimate calculated by the system. The user may modify this value if needed prior to printing a shipping label.
Remove Item From Carton button: Use this button to remove one or more items from a carton (as shown in the figure below). Note that all removed items are returned to your inventory.
My Notifications page
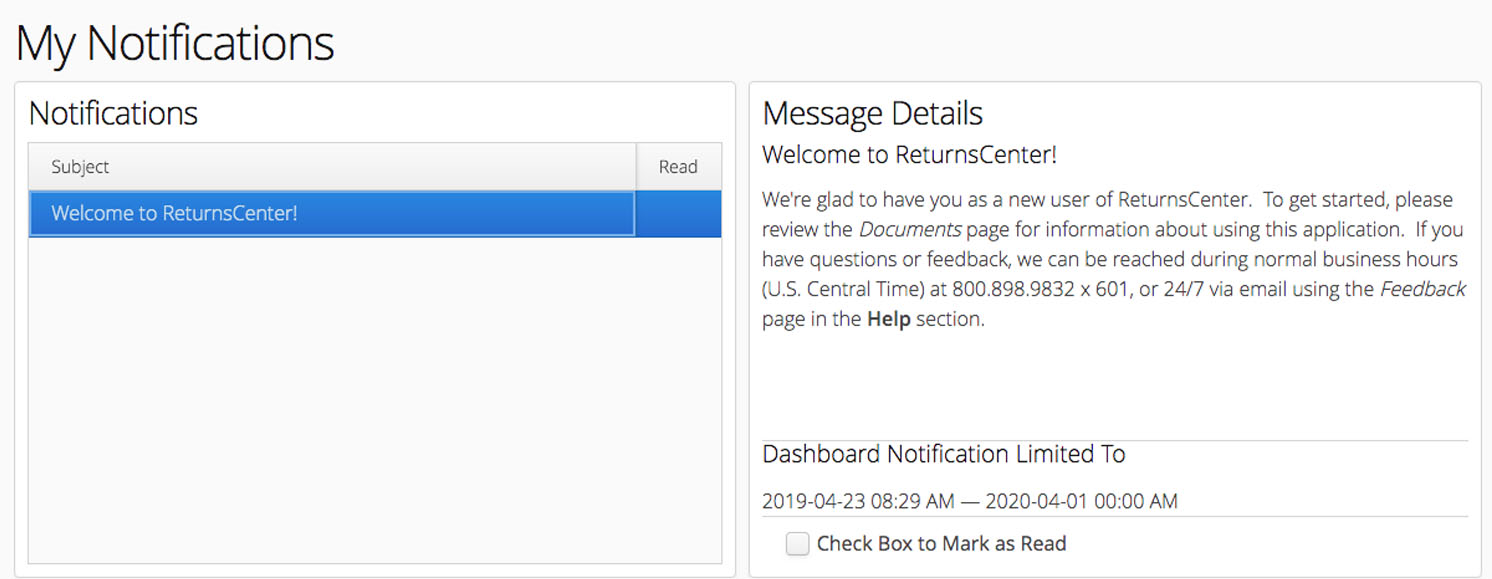
The My Notifications page is used to manage your current notifications and to provide a place to review notifications you have previously marked as read.
The Notifications table on the left lists all of the messages you have received and their status (read or unread).
The Message Details pane on the right shows the details of the message selected in the Notifications table (highlighted in blue). Below the Message Details pane, the original date range for viewing the selected message is shown, along with a box to change the message status. Messages identified as read (box checked) are no longer displayed in the dashboard widget but remain archived here for review if needed.